Posted to News on 9th Oct 2008, 14:38
Easy, quick calibration of CNC machine tools
IBS Precision Engineering is launching the R-test system, which offers a fast and precise method of determining rotary axis location in multiple-axis machine tools, with results output as simple x, y and z co-ordinate readouts.

The ability of users to maximise the capabilities of their five-axis machine tool investments hinges on the precise alignment and calibration of their production equipment. At the heart of this task is the need to determine the true position of rotating axes with respect to the linear axes.
With the new R-Test system, data analysis is provided to ISO 230 machine tool testing standard and achieves sub-micron accuracy without the intricate and painstaking procedures of traditional machine alignment and set-up methods. It is suitable for calibrating swivelling head as well as both 360-degree and limited-arc rotary table CNC machines, with offset errors for rotating axes computed either independently or in combination.
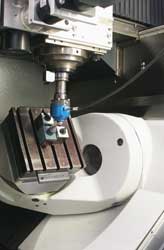
The portable R-test system consists of an MT-Check probe with interface unit, a stem-mounted precision 22mm diameter carbide Masterball, tool-holder with alignment unit and all necessary mounting tools. Suitable for CNC machine users and builders alike, it produces results in minutes without special operator knowledge or experience.
How it is used
Three planar elements in the system's MT-Check probe are brought into contact with the Masterball to take a reading. The displacements of the contacts are monitored by three independent measuring systems as the Masterball is rotated - enabling its centre-point co-ordinates to be determined precisely in the x, y and z machine directions.
Both static and dynamic operations are offered in the R-test, with intuitive Windows-based software outputting readings quickly and conveniently to a laptop PC. In both cases, the Masterball is mounted arbitrarily on the rotating part of the machine and the high-precision probe unit attached to a non-rotating element. Static calibration accurately measures axis location errors, while use in dynamic mode provides total machine calibration in 3D - reflecting full five-axis operation.
Want the latest machine building news straight to your inbox? Become a MachineBuilding member for free today >>


