Posted to News on 11th Oct 2007, 13:59
Innovative automated inspection system uses deflectometry
Micro-Epsilon has worked with BMW to develop a vision-based system, known as reflectCONTROL, for detecting defects in paintwork and glass in the micron range.
Quality demands from customers have increased significantly in recent years, so it has become critical for automotive manufacturers to ensure the quality of high-gloss surfaces such as paintwork and glass.
The quality control of this type of reflecting surface still takes place largely using manual techniques. Typically quality control personnel observe reflected images using fluorescent lamps on the surface to detect defects. This method is expensive, time-consuming and provides results that are often difficult to reproduce and not quantifiable.
In order to detect dents, bulges and other surface defects on a reflecting object – for example, a car bonnet – normally the reflected image of the surroundings on the surface is observed. The difference between the surroundings and the reflected image is a measure of the quality of the surface. To apply this process, which occurs naturally in the human brain and eye, to an automatic quality control system demands considerable expertise in sensors and image processing.
BMW is currently working closely with sensor system specialist Micro-Epsilon, developing and testing complete surface defect detection systems. These can operate as stationery test rigs or on robot arms that scan multiple inspection points on car body parts, automatically identifying and marking any surface defects. System such as these will enable complete car bodies to be inspected in less than 90 seconds typically. By introducing this at various stopping points in the assembly line, production delays will therefore be avoided.
Starting small
Franz Hochwimmer, Sales Engineer at Micro-Epsilon's Systems Division, comments: "Since 2005, we have been working closely with BMW, initially developing systems to detect surface defects on small, plastic and rubber components on the car. This involved the inspection of components such as car bumpers, mudguards and cylinder heads – but not the complete body of the car. At the end of 2005, Micro-Epsilon supplied a system for BMW's Dingolfing plant to automatically detect surface defects on the sides of the car, including front and rear mudguard areas and the doors."
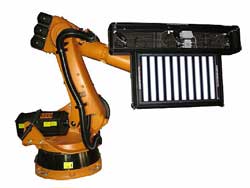
Micro-Epsilon's reflectCONTROL 'deflectometry' system has been developed to such an extent that it can now be used in industrial production environments. To ensure reproducible, well-structured surroundings – the reflected image of which is to be recorded and evaluated – a striped pattern is shown on a display. Cameras record the reflected image of the display and pass the data to an industrial PC for evaluation. The complete system set-up is mounted on a robot arm. It is therefore possible to move the system around the object to be inspected, for example, a car body. Alternatively, a stationary installation is possible, in which the parts are placed on a measuring table.
Hochwimmer continues: "More recently, in 2006, we installed reflectCONTROL on a robot arm, which inspected around 36 per cent of the car body for defects. BMW Dingolfing has evaluating these results now with a view to installing a complete, four-robot detection system shortly, which will inspect complete car bodies across two vehicle assembly lines."
In Micro-Epsilon's reflectCONTROL system, an LCD with a screen diagonal of up to 40 inches is used as the display. The cameras used are high-resolution CCD cameras. It is therefore possible to measure an area of 60cm x 80cm in one recording. If a larger area has to be measured, the measurement system can simply be positioned at various places along the surface by the robot. Here, the control of the robot is integrated into the system. With this set-up, even very small defects down to 0.5mm can be detected reliably.
Pass or fail?
In quality assurance, a decision has to be made whether a part is acceptable or defective. In a manual procedure, the worker must reliably recognise different faults in order to be able to make this decision. With a sprayed surface, for example, these may be large dents, inclusions in the spray coating, porosity, grinding and polishing marks, and so on.
With deflectometry, the reflected image recorded by the camera is processed by a computer. During the analysis of the image data, the various faults must be reliably detected and unambiguous decisions made. Whereas a dent causes a slight change in the surface curvature over a comparatively large region, the change of curvature for an inclusion in the spray coating is very large, but is restricted to a very small area. To enable the system to accurately and reliably measure to such a high resolution, the system constantly compares the inspected data with the exact 3D CAD model. Otherwise, for example, openings in the body parts may be erroneously detected as faults.
At BMW's Dingolfing plant, in-line stations are planned that will evaluate the complete car body. To do this, four robots in a measurement station, will acquire approximately 65 to 80 inspection points on the body. The inspection of the complete body will last for between 60 and 80 seconds. If the test rig is positioned at a stopping point in the production line, the process can take place in-line and without introducing delays.
There are many advantages with this fully automated quality control system. The primary factor here is, of course, the dependability and absolutely reproducible decisions as to whether a part is acceptable or defective. For further inspection and possible processing, two additional robots downstream of the inspection unit mark the defects. Also, the defects that occur are saved and documented, so that they are available for more thorough analysis later. Consequently, it is possible to generate statistics documenting which types of defect occur and how often. Statistics of this nature can then be used for optimising the processes, leading to improved quality and reduced scrap and rework costs.
The reflectCONTROL measurement system is also suitable for other applications. The method can be employed where shiny or reflecting surfaces need to be checked for defects. Examples can be found in the manufacture of clear-coated display covers, glass surfaces, mirrors or cold-rolled metals. Indeed, Micro-Epsilon has already worked with BMW on a transmission-mode version of reflectCONTROL that detects flaws in glass laminations and the glass itself.
Due to the success of the joint development at BMW, Micro-Epsilon is currently seeking other development partners. For more information on Micro-Epsilon's reflectCONTROL system, please contact Micro-Epsilon UK.
No. 1 Shorelines Building
Shore Road
CH41 1AU
UNITED KINGDOM
+44 (0)151 355 6070


